The Complete Sex Doll Installation Guide
Everything you need to know to set up your sex doll correctly from day one — from safely unboxing your order to attaching the head, adjusting the eyes, and customising her look. Applicable to all major TPE and silicone doll brands. Looking for your first doll? Browse our full collection.
Before You Begin
A proper first-time installation sets the foundation for years of safe, satisfying use. Many issues owners encounter — a loose head, misaligned eyes, or a wobbly stand — are almost always the result of skipping steps during initial setup. This guide walks you through every stage in the correct order so you get it right the first time.
We recommend watching each video in full before attempting the step yourself. Have a soft blanket or foam mat ready to rest your doll on, and keep the accessory bag that came in the box close by — it contains the tools you will need for eye adjustment and head installation.
Unboxing Your Sex Doll
Remove the protective foam and accompanying accessories from the packaging.
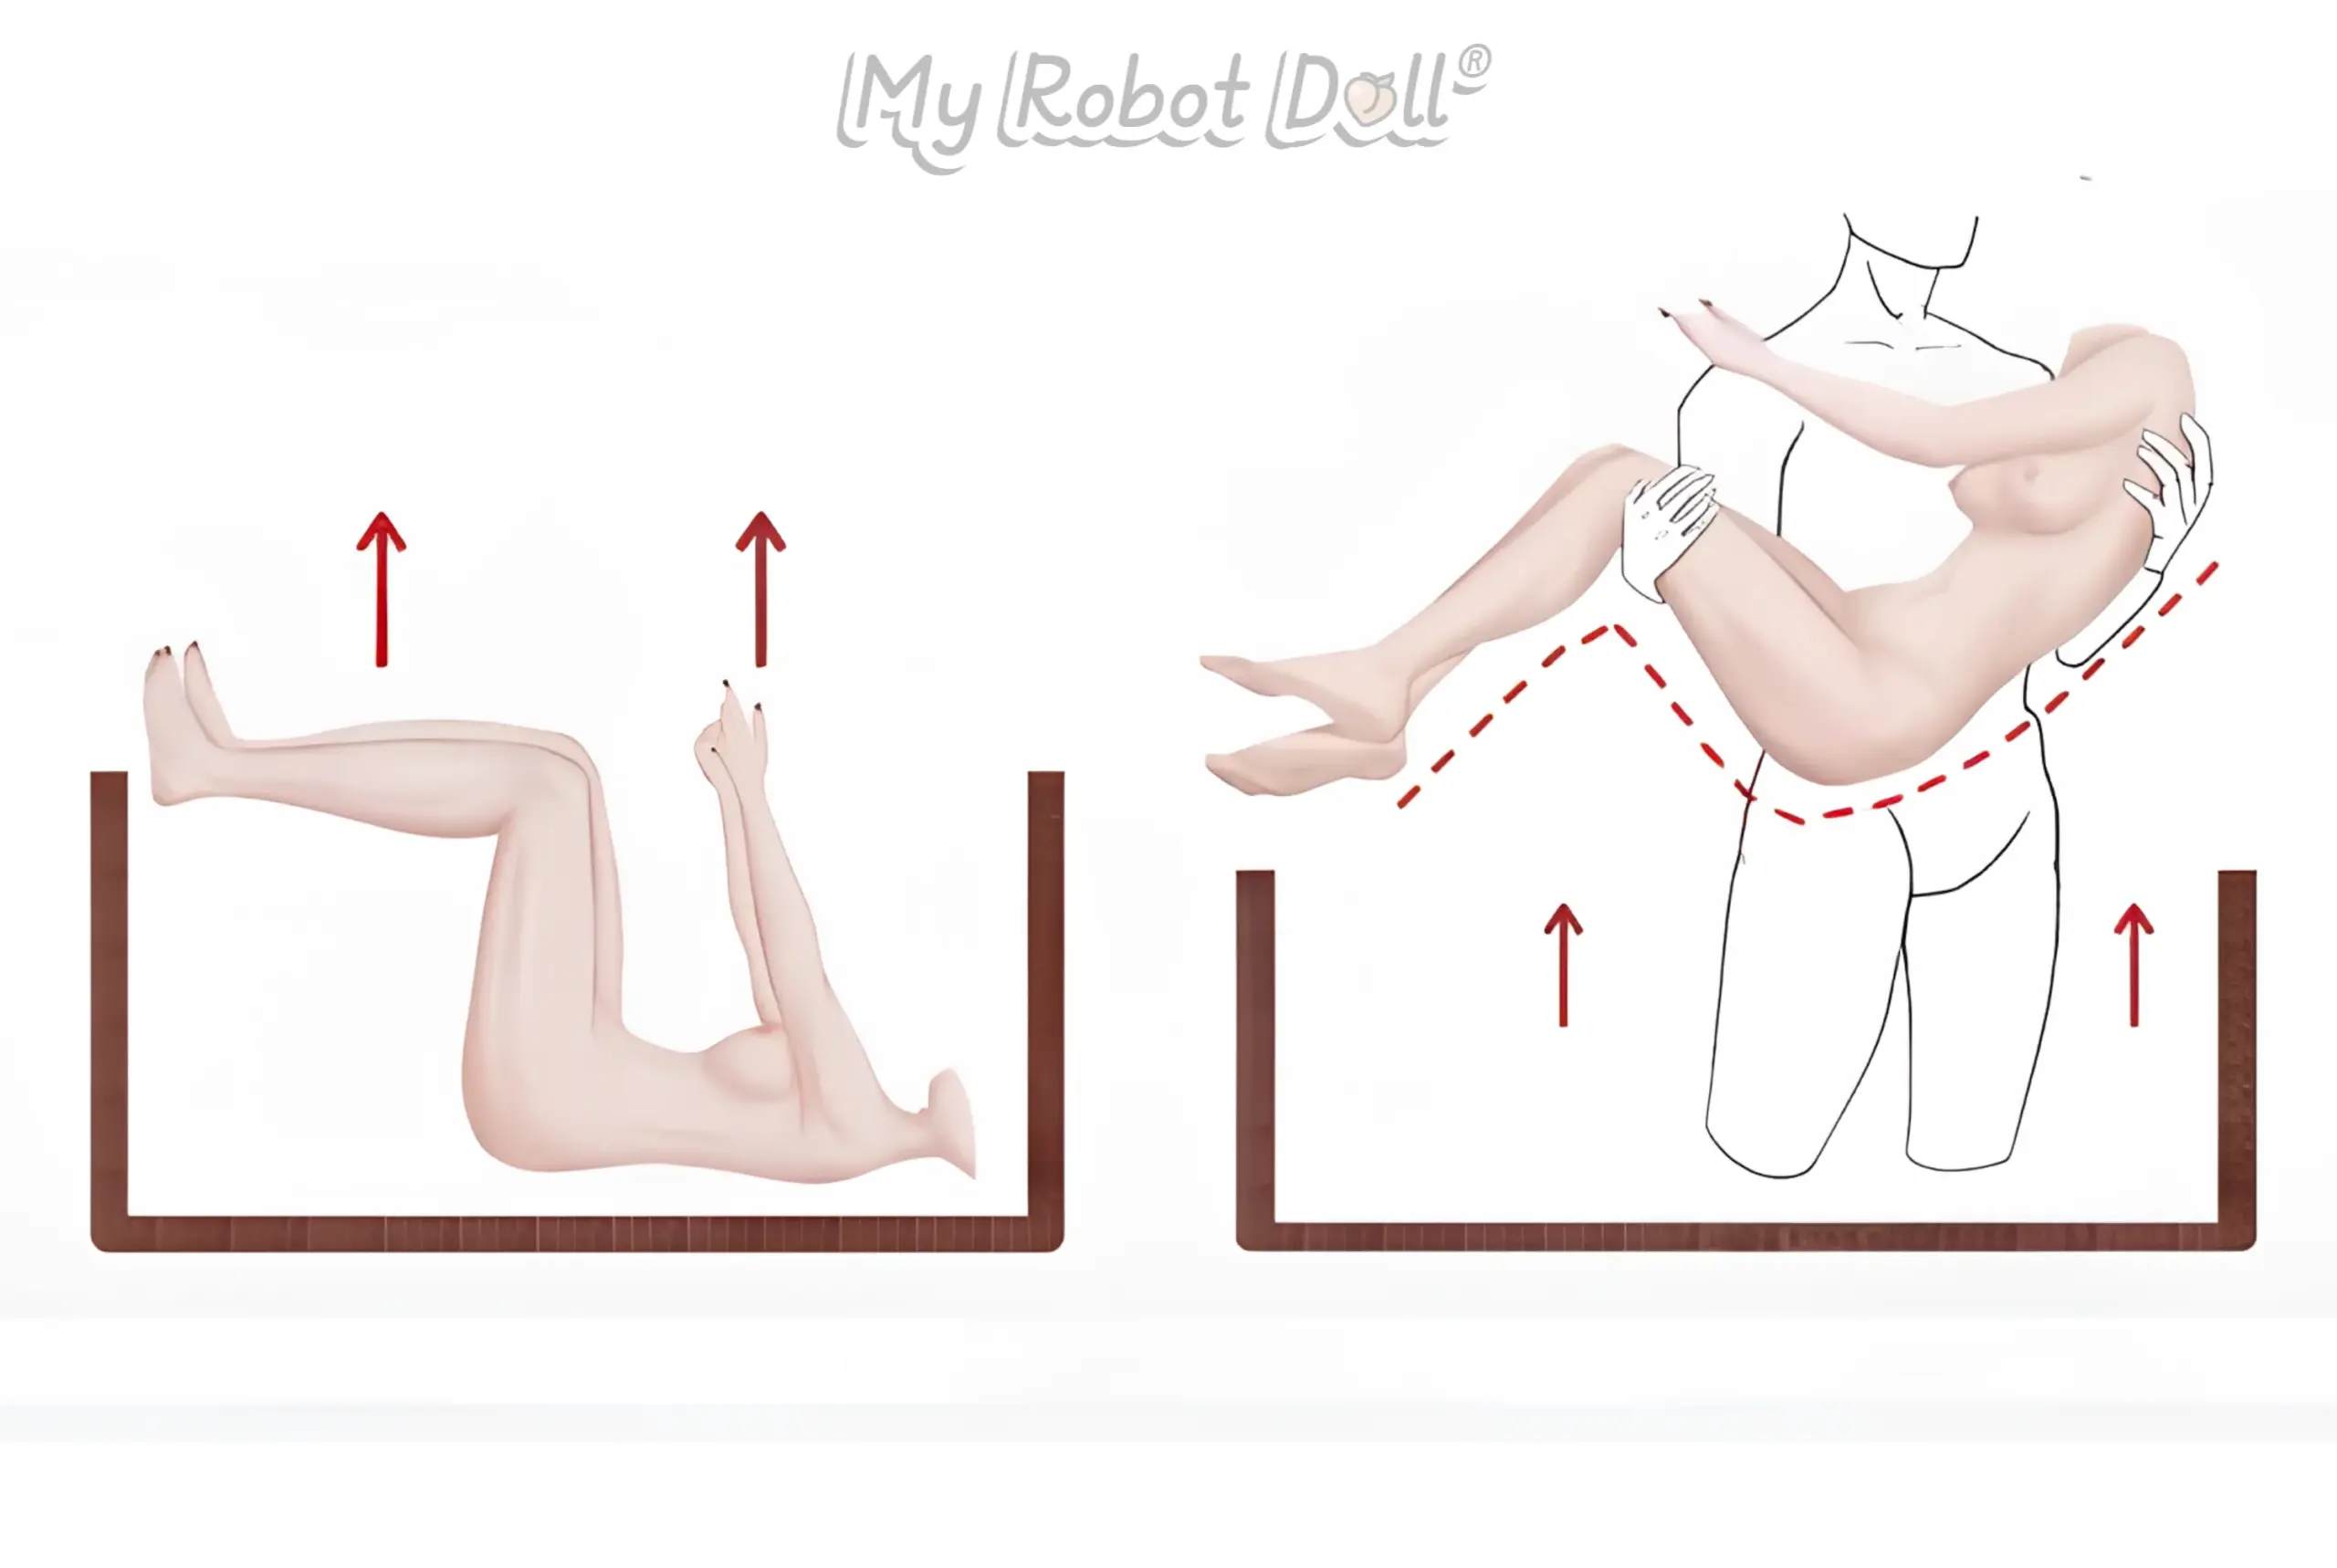
Position the doll to match the reference image provided.
Lift the doll out using a bridal lift, with your arms passing around its back and behind its knees for gentle and secure support as shown in drawing.
Your doll arrives carefully packed to protect every part during shipping. Before doing anything else, watch this video to learn how to safely remove her from the packaging without scratching the skin or bending the skeleton joints at an awkward angle.
Lay a soft blanket or thick towel on the floor or bed before sliding the doll out of the box — TPE and silicone skin can pick up surface marks on rough floors. Take your time, and have a second person assist if the doll is full-sized, as they can be quite heavy. Once unboxed, inspect all components before discarding the packaging. Keep the original box — it is the safest way to store or transport your doll in the future.
Key Tips
- Never lift the doll by the head, hands, or feet — support the full body weight from underneath.
- Check all components on arrival: head, accessory bag (tools, spare eyes), and body.
- Your doll may have a light powder coating on the skin — this is normal and washes off easily.
- Document any shipping damage with photos and contact your supplier within 24 hours.
Setting Up the Doll Support Stand
Before you begin attaching any components, set up your support stand first. Having your doll in a stable upright position makes every subsequent installation step — particularly the head and eyes — significantly easier and safer. The dual-support stand distributes the doll’s weight across two contact points, preventing tipping during setup.
This video demonstrates how to assemble the stand, position your doll correctly, and secure it safely. Most support stands are compatible with all standard full-size dolls regardless of brand — check the listed weight limit against your doll’s specifications before use.
Key Tips
- Use the stand on a level, non-slip floor surface to prevent tipping.
- Pad any contact points with a soft cloth to avoid pressure marks on the skin.
- Do not leave the doll standing unattended on the stand for extended periods.
- The stand is also useful later as a washing aid — position it before cleaning.
How to Install and Remove the Head
Attaching the head is one of the most important steps in the setup process. Done incorrectly, it can damage the neck connector, scratch the skin around the seam, or leave the head sitting unevenly. This video covers the full process — both attaching and detaching — so you are confident in both directions from day one.
Most dolls use an internal neck bolt that threads into a receiver on the torso. The key rule is to align the bolt straight before applying any rotation. Never force it if you feel resistance — a smooth, gentle twist is all that is needed. A correctly installed head will sit flush with no gap or wobble.
Key Tips
- Support the head with both hands throughout attachment — never let it drop.
- Hand-tight is enough — over-tightening can strip the connector thread.
- To remove, twist slowly counter-clockwise while supporting the body.
- Cover the neck opening on the body with a cloth when the head is off to keep it clean.
Head Installation — M16 Connector Types
Option A — Set Screw M16
Option B — Quick Connector M16
M16 neck connectors come in two styles — Set Screw and Quick Connector. Watch both videos above to identify which type your doll uses, then follow the matching method. The set screw version requires a small hex key (included in your accessory bag), while the quick connector clicks in and releases with a simple push-button mechanism.
After installation, the head should sit perfectly flush against the neck with no visible gap on any side. If you notice any tilt or instability, remove and repeat — the connector simply did not fully engage. This is completely normal on the first attempt and takes only moments to correct.
Key Tips
- Check your accessory bag to identify whether you have a hex key (set screw) or a push-button tool (quick connector).
- After attaching, gently pull the neck skin downward over the seam for a seamless look.
- Check that the head faces straight forward before declaring the installation complete.
- If you own multiple heads, label each with its connector type if they vary between models.
How to Adjust the Eyeballs
The eye direction is one of the first things you will want to personalise after the head is installed. A forward gaze, a soft upward glance, or a subtle sideways look each create a very different expression and feel. This video shows how to reposition the eyeballs precisely and safely without touching the painted iris surface with your fingers.
Most doll eyes are held in place by a gentle tension mechanism inside the socket. Use the small adjustment tool from your accessory bag — not your fingers — as skin oils can gradually dull and cloud the eye surface over time.
Key Tips
- Work in good lighting so you can clearly see the eye position as you adjust.
- Make small, gentle movements — the eyes respond to very light pressure.
- Adjust both eyes together to maintain a natural, symmetrical gaze.
- If you notice smudges on the eye surface, clean with a soft dry cloth only.
How to Replace the Eyeballs
Want to change your doll’s eye colour entirely — from brown to blue, green to grey? Most modern sex dolls have user-replaceable eyes, and the swap takes just a few minutes once you know the right technique. This video demonstrates how to safely remove the existing eyes and seat new ones without damaging the eyelid skin or socket.
Replacement eyes are widely available in a broad range of colours and styles. Always confirm your doll’s eye size (typically 14mm or 16mm) before ordering, as this varies between manufacturers. You can find replacement eyes and accessories in our shop.
Key Tips
- Rest the head face-up on a padded surface before starting any eye work.
- Keep replacement eyes in their protective case until the moment of installation.
- Handle eyes by their edges only — avoid touching the iris surface directly.
- Confirm each eye is fully and evenly seated before finishing.
Want to change your doll’s look? We stock replacement eyes, wigs, and styling accessories.
Shop AccessoriesLooking for the Full Care Guide?
This guide covers installation only. For ongoing maintenance — cleaning, hair care, washing, skin renewal, and repair — visit our dedicated guides below.
Frequently Asked Questions
Common installation questions from new doll owners.
Does this guide work for my brand of doll?
Yes — the installation techniques shown apply to the vast majority of full-size TPE and silicone dolls currently available, regardless of brand. Head connectors, eyeball systems, and support stands are very similar across manufacturers. The only exception is AI or robot dolls with electronic components, which may have additional brand-specific steps.
The head feels wobbly after installation — what should I do?
A small amount of natural movement is normal and allows for posing. However, if the head feels very unstable, the neck bolt has likely not fully engaged the receiver thread. Remove the head, realign the bolt carefully, and try again — going slowly and ensuring the bolt is threading straight rather than at an angle. Do not force it.
What size replacement eyes does my doll need?
Most full-size sex dolls use either 14mm or 16mm eyes. The size is usually listed in your doll’s product description or manual. If you are unsure, carefully remove one of the existing eyes and measure the diameter, or contact your supplier with your doll’s model name for confirmation.
Do I need the support stand, or can I skip it?
The support stand is not strictly required for installation, but it makes the process considerably safer and easier — particularly for head attachment and eye work, which benefit from having the doll at an upright, stable height. It is also invaluable for cleaning later on. We strongly recommend setting it up before starting any other step.
My doll has a small mark or scratch from unboxing — can it be repaired?
In most cases, yes. Minor marks, dents, and surface scuffs on TPE and silicone skin can often be addressed at home. See our detailed TPE and silicone repair guide for step-by-step instructions covering the most common types of damage.